Tuesday 31 May 2011

Giveaway time!

Well, last night, much to my surprise and delight....I reached 150 'likers' on my Stuff Mummy Makes Facebook page!
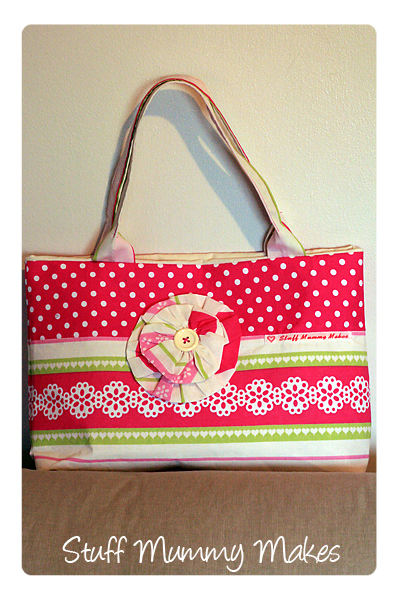
I know, right? I feel very touched and honoured by all the nice things people have said - so much so that I've decided to give away one of my 'Romance' bags to one of you! 
All you have to do is leave a comment below telling me, if YOU won the bag, what colours/theme you would like it to be. Post before midnight tomorrow GMT (so Wednesday night) to be in with a chance to win. It's that simple!
Then a winner will be picked at random who will receive a one off bag, made just for them in the colourway they chose!

Please remember to leave an email address in your comment if I don't have another way to contact you - otherwise you'll miss out! 

Good Luck! 


************
Well as I got to 200 likers so quickly (even more wow - I wasn't expecting that lol!) I have decided that I'll be giving away TWO bags now! So come and get your entries in!!
Good luck!

Friday 27 May 2011

Long time no see lol!

Sorry I've been MIA for a little while - I've had a project or 6 that I've been working on, but had to keep a secret until now as the people they were a surprise for have my blog addy lol! So now they all have them - I can show you!
Some of you will know my Dad's been in hospital...and his nurses did such a good job that he wanted to give them a thank you gift! So he asked me to make each of them a bag, as some of them had seen the one I made my Mum for Mother's Day and said they liked it!
And here they are - all six of them lol! 


By all accounts they were very pleased with them, so yay! I'm glad I was able to do something nice for them after the great way they looked after my Dad!

Also, remember my post with the photoshopped Farbenmix Vida dress? Well, I finally got it made! Yay me! 
Here it is.....I'm so happy with it - I think it's the most ambitious single item I've made since I started sewing!

The back of the dress....
 and the front! 
I think I'm going to have a weekend off now lol! 

Thanks for looking, hope you have a great long weekend! 

xxx

Monday 16 May 2011

'Planning fabric choices in Photoshop' - tutorial.

I had this lightbulb moment yesterday, and have been asked to share with you how I do it, so here goes!
(To see the images full size, just click on them).

1. Take a photo of your pattern picture, and the upload it into photoshop. I resize mine to 600x400 just for ease of use and file sizes! This will be referred to here as 'Background layer'.


2. Create a new layer (layer>new in menu bar) - this will be referred to here as 'Layer 1'.

3. Make sure your brush tool is set to 100% hardness and around 3 pixels (if you're using 600x400 image), then using your PEN tool, draw around one section of the pattern. Then right click>stroke path. When the pop up box appears, make sure it's set to brush, and if the little box is checked underneath that, uncheck it. Click OK. Then right click>delete path. Repeat for each section, and it should now look like this - 


4. Hide the Background layer (click the little 'eye' next to the layer in the layers palette), and you'll be left with this...


5. Either drag-and-drop or use right click>place to add a fabric pic. Place this layer BEHIND (or below) Layer 1 in the layers palette. Then right click>rasterize layer.


6. Click on Layer 1 in the layers palette so it is highlighted, then using your magic wand tool, click on the section of pattern you want to add the fabric to. You will get a marching ants outline. 


7. Click your fabric layer in the layers palette to highlight it, then go to Select>Inverse in the menu bar, then press Delete on your keyboard.

This is what you should get...


8. Repeat with different fabric layers for different parts of the pattern until you're happy with the result!


9. Finally, show the Background layer by reclicking the eye icon, and hide Layer 1 by clicking the eye next to that layer, and you're done!


***If you already have a black and white line drawing on your pattern (lucky you!) you can skip steps 2-4, add your fabric layer ON TOP of your background rather than underneath, and just proceed from there, treating your background layer as LAYER 1 above.

Hope that makes sense! 

Thanks for looking
Lisa
xxx

Sunday 15 May 2011

Using Photoshop to plan fabric choices!

This was kind of a lightbulb moment for me this afternoon.....so I thought I'd share! Those of you who sew and have Photoshop have probably been doing this for years, but I've only just caught on (I'm not the sharpest tool in the shed, if you hadn't already guessed! Ha ha!).
In the post below you'll see I bought a Farbenmix Vida pattern, and I was trying to plan in my head what fabrics I had and what to put where, when I suddenly had a brainwave - why not Photoshop it?

So I took photos of the fabrics, and a photo of the line drawing on the front of the pattern, et voila! Instant (relatively!) dress right there on the screen!


I think I'll be doing this now for all my patterns!

Thanks for looking!

Lisa xxx

Saturday 14 May 2011

Yay! New Pattern Goodness!

My Farbenmix Vida pattern arrived from Dots n Stripes today! Super fast delivery, too! I'm so excited - I can't wait to get sewing this beautiful dress.

You'll see just on the right there the little label that came with it to sew onto the dress - I didn't know you got that too, so that was a lovely surprise! Here's a bigger picture of it...

Cute, huh? 

And finally, this made my day - on my delivery note from Dots n Stripes ....

It's the little personal touches that make all the difference, isn't it? I'll definitely be buying from them again!

Besides this, I have a tonne of other sewing to do too over the next few days - but hey, it's better to be busy, right? lol!

Hope you have a great weekend everyone, and thanks for looking!
Lisa
xxx

Friday 6 May 2011

I've been a busy girl!

Over the past couple of days, so I thought I should share with you what I've been making!

Firstly was a couple of bags (yeah, like you're shocked......lol!) - I think these have a very fresh and spring like feel to them!

Fabric used: Kate Spain Central Park North Meadow Aqua
Free Spirit Designer Beads Mist
Free Spirit Designer Solids Aqua
15mm Plain Ribbon Plum

Fabrics used:  Carolyn Gavin Spring Street Buzzing Gardens Multi
Carolyn Gavin Spring Street Tossed Flowers White
Free Spirit Designer Solids Lemon
15mm Plain Ribbon Blue

 All the above fabrics and ribbons were bought from Sew Me Happy - my favourite UK fabric shop! (And I'm not getting any payment or goods for this mention - I just love them!)

And then something that's NOT a bag - another dress! This one is for a friend's gorgeous little 2 month old girl - I hope she likes it! Its based on the Made By Rae Itty Bitty Dress  with a few variations of my own. You'll notice this is the same fabric as my camera bag and the other little girl's dress I made - I think it suits the style perfectly!


So that's it! 

Have a great weekend, and thanks for looking!
xxx

Thursday 5 May 2011

I got published!

One of my scrapbooking pages (I know, I don't post them much here!) got published this month over at GingerScrapsStreet Magazine! I had totally forgotten about it until a friend saw it and reminded me lol! I used the amazing Black and White & Gray kit from Randi Oh Designs and the photo is (as per usual!) of Jamie!


so yay! That was a nice piece of news today! 
Thanks for looking!
xxx

Tuesday 3 May 2011

Halter Top tutorial

OK, so here goes - bear with me, I had no photos for this one so I've gone with a diagram! Hope you can make sense of it! 


See, I knew you'd get it......rofl!

Ok, so the amount of fabric you need will depend on the size of top you're making, obviously - so I won't tell you how much you need! For mine, I used a yard of main fabric, and then 5 charm pack squares. You'll also need some elastic - I used 1/4" (6mm).
  • Firstly, decide on how long you want your top to be, and measure it. How high up the chest you'd like it to come, and where would you like the bottom to sit - on your waist? Hips? I wouldn't recommend tunic length, unless to omit the elastic from the bottom - it might look a little odd!
  • Next, you need to work out how many charm squares you will need, and sew them into a long strip. Alternatively, you can just use a long strip of co-ordinating fabric.
  • Then you need to decide how wide the top of the top will be - then halve that measurement (as your fabric is folded) and add half THAT again. Clear? (So say your top will be 20cm - halve that to 10, then add 5. ) That's your top measurement.
  • Then do the same for the bottom...only this time, measure all the way round your waist/hip, halve it, halve it again, then add half that. That will give you your (B) measurement.
  • Next, from an existing top you have, mark arm holes (but remember the top of your top doesn't come all the way up to the shoulder, so mark only from where your top will sit!).
  • From the bottom corner of your arm hole, draw a straight line down to the bottom corner of your bottom line. Your 'pattern' should now look like the main outline on my picture above. It does? Amazing!
  • OK, now the hard part is out of the way - cut it out, (with whatever seam allowance takes your fancy, remembering to leave enough top and bottom for elastic threading!) but leave it folded.
  • Now to cut your back piece - exactly the same size as your front piece, but only as long as the bottom of your armhole (C). Cut out with seam allowances as before.
  • Now, back to the front piece. On the fold, mark in 1cm at the top, and 4cm at the bottom. Draw a line between the two points, and cut. (D) This will be your graduated front panel.
  • Take your charm squares (sewn into a strip) or fabric strip, lay it out flat, and add your two front pieces - 2cm apart at the top, and 8cm apart at the bottom. I did mine by folding over a small edge on the front piece and pressing, then folding again, laying on and top stitching. 


Still with me so far? You're doing great!
So now you should have one front piece, and one back piece. You HAVE? You rock, you know that? 
  • Now we need to sew the channels for the elastic on the tops of each piece. The size is up to you, but will obviously depend on the size of your elastic! Once you've done that, I used the technical method to measure my elastic - holding it up against myself and saying 'Yep, that's about right!' lol! 
  • Then thread your elastic on the top of the front piece and back piece, pin in place, and and sew front and back together down the side seams (making sure you have right sides together so your seams are on the inside!).
  • Now for the bias binding and straps.....and I have a confession to make. My straps aren't cut on the bias *SHOCK*. The armhole bindings were, however...there's no way straight cut would go round those corners! If I'd had enough left over fabric, the straps would have been too. But I didn't. If you decide to use all bias tape, then you can do these in one continuous strip from armhole to strap, whereas I did mine separately. If you don't know how to make your own binding, here's a fantastic  'Make your own bias binding' tutorial!
  • Once you have made your binding, straps, etc, decided how long they need to be to go round your neck (I'm assuming here you're not a giraffe - I've never seen a giraffe with a sewing machine), then you need to sew them on - you can find more about this in the tutorial mentioned above.
  • Wow, is it looking like something you could actually wear yet? I do hope so....although if you follow my ramblings, then it may be not so much lol! Now we just need to finish...
  • The bottom! Now, if you're leaving it loose with just a hem, then hem it and you're done, so go for it! 
  • If, however, you want it like me with an elasticated bottom (my top, not MY actual bottom!) then you need to sew a channel for the elastic round the bottom, remembering to leave a gap to actually put the elastic in (unlike me, who had to unpick some!) 
  • Then thread your elastic, sew in place, and finish up the gap in the hem!
Woohoo! You're finished! Well done you! (Especially if you managed to follow these instructions without the need of psychiatric help lol!)

If you decide you're brave enough to take this on, please come back and link me up so I can see your versions (I'm nosey like that!)
Thanks for taking the time to look, and hopefully read and make this!
Lisa xx

Sunday 1 May 2011

Riley Blake Summer Halter Top

So those of you who are regular visitors here (I thank you!) will remember my post about winning a Riley Blake charm pack and full yard from One Hundred Years Ago and Plum Patchwork...

well, here's what I made with it!
A halter neck tie top with a patch front panel..it has elastic at the top, across the back, and round the bottom, and is very comfy!
I'm so pleased with it, I want to make another - and if I do, rest assured I'll also write a tutorial for it too!
I'm also entering this in the Made by Rae Spring Top sew-a-long, so look for me there!

Front
Back

Patch panel detail 

Thanks for looking! 

Getting an early start...

Well for some reason, (and trust me, this NEVER happens!), I'm making an early start on things for that most dreaded of C-words... CHRI...